In the video above Brad from Deutsche Hydrapro reviews why you would want electric-over-hydraulic brakes for your next Maxx-D Trailer. For trailer braking systems, the debate between hydraulic brakes and electric brakes is ongoing. While electric brakes are more commonly used, electric-over-hydraulic (EOH) brake actuators offer significant advantages that allow them to be the preferred choice for many heavy-duty towing applications and customers who use their trailer daily. In this article, we’ll explore why hydraulic brakes outperform electric brakes, the importance of proportional braking, and what sets the Deutsche Hydrapro EOH brake actuator apart from competitors.
One of the biggest advantages of hydraulic brakes is their superior stopping power compared to standard electric brakes. Hydraulic brakes provide:
Electric brakes are commonly used on pickup trucks, but if they were truly the best braking option, they would be used on all vehicles—including commercial trucks. Instead, hydraulic brakes offer better control, particularly when towing heavy loads.
A critical factor in any braking system is the ability to proportionally control the force between the tow vehicle and the trailer. Without proper braking distribution, you may encounter:
Hydraulic brakes, especially when controlled by an EOH actuator, ensure balanced and proportional braking. This prevents dangerous braking delays and enhances overall driving safety.
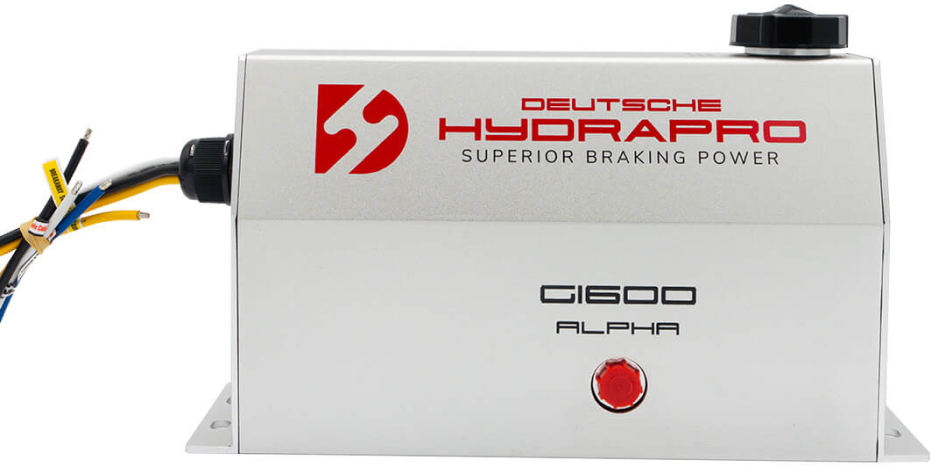
Deutsche Hydrapro electric-over-hydraulic actuators are designed to provide the smoothest brake application with industry-leading compatibility. Here’s what makes it superior to competitors:
A common issue with EOH braking systems is premature wear due to incompatible brake controllers. When towing a trailer with an electric-only brake setting, the system can still function, but:
To avoid this problem, ensure your tow vehicle is properly set to EOH mode. If your truck doesn’t support this, an aftermarket brake controller is necessary.
Some drivers worry about brake lag—the time delay between pressing the brake pedal and the trailer brakes engaging. Deutsche Hydrapro products minimize this issue with:
This reduces driver stress and provides instant braking response, even in emergency situations.
One often-overlooked factor in EOH braking systems is wiring quality. Using undersized wiring can lead to:
Deutsche HydraPro combats these issues with:
When purchasing a trailer, ask about the wiring setup—it’s crucial for long-term performance.
A final advantage of Deutsche Hydrapro’s system is proportional braking technology. Unlike basic actuators, which continuously run while stopped:
This feature prevents overheating and ensures a durable, reliable braking system, even in high-traffic or long-haul situations.
For those hauling heavy loads, safety and reliability are top priorities. Deutsche Hydrapro electric-over-hydraulic brake actuator offers:
If you’re looking for the most advanced EOH brake actuator on the market, Deutsche Hydrapro is the clear choice. Upgrade your braking system today and experience stronger, safer, and smoother stopping power with one of our dealers around the US!
Learn firsthand from a trailer manufacturer that allows you to buy a custom trailer
with our hydraulic brake system, at DiamondC.com.
Before starting, take the necessary safety precautions:
✅ Make sure people around you are aware that you are working underneath the trailer.
✅ Secure the trailer on a stable lift or jack stands.
✅ Remove the wheels to access the brake components.
Before beginning the bleeding process:
🔹 Ensure all fittings are tight.
🔹 Visually inspect the brake fluid level in the reservoir.
If you don’t have an auto filler, have someone assist by manually refilling the reservoir as needed.
Begin the bleeding process at the rear axle, as this helps push any air bubbles back toward the reservoir. Follow this order:
1️⃣ Rear Axle
2️⃣ Passenger Side Front
3️⃣ Driver’s Side Front
This sequence ensures the air bubbles travel toward the reservoir for proper removal.
Once the fluid runs clear with no bubbles, close the valve immediately to prevent leaks and ensure proper bleeding.
🔹 Close the auto-filler or manually top off the brake fluid.
🔹 Turn off the brake pump.
🔹 Reinsert the Breakaway Pin to finalize the process.
Listen for a humming sound when engaging the pump to verify that your brakes are properly bled. The hum should last no more than two seconds before the brakes engage.
That’s it! Your hydraulic brake system is now bled and ready to go.
🔧 Regular brake maintenance is key to ensuring the safety and longevity of your trailer. Stay tuned for more maintenance tips and guides! Click here to see the full lineup of brake actuators.
Contact Details
Feel free to contact us by phone, email or via contact us form.

445 E FM 1382, Suite 3672 Cedar Hill, TX 75104

Business Hours
Monday - Friday: 8:30am - 5:30pm PST
Saturday & Sunday: Closed
Resources
Wiring DiagramProduct ManualWarrantyTroubleshooting GuideVoltage/PSI Drop CalculatorFAQ'sLocate A DealerBecome A DealerMAP PolicyEOH MaintenanceDOT letter for EOH


© Copyright 2025, Deutsche Hydrapro LLC


